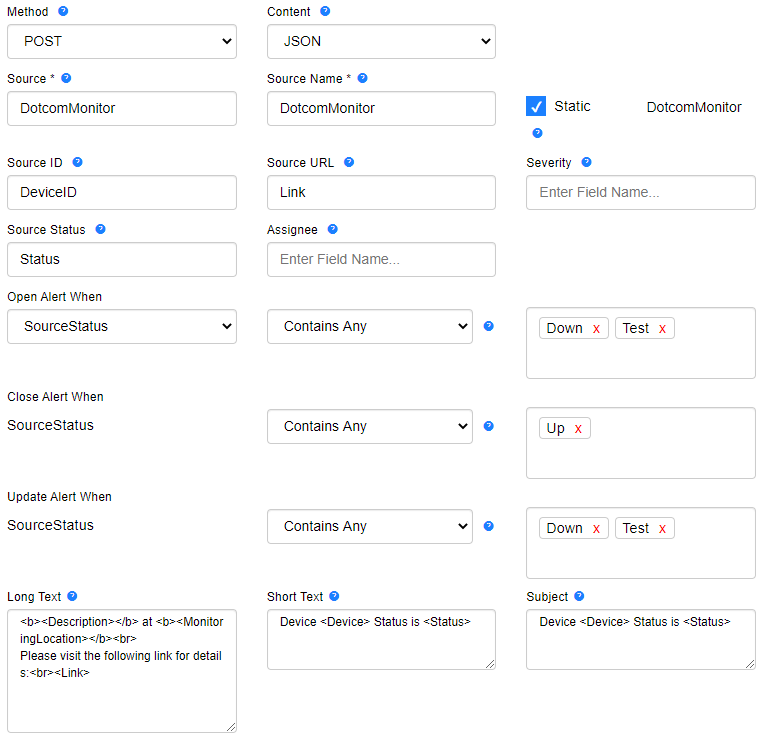
To configure the integration with AlertOps, you must have an active Dotcom-Monitor account and an active AlertOps account.
On the AlertOps side:
- Log in to your AlertOps account.
- From the side menu, click Manage > Integrations, and then select Inbound Integrations from the sub-menu.
- Select API tab and click ADD API INTEGRATION.
- Select Dotcom-Monitor from the pre-built Integration Templates.
- Configure and save basic integration settings.
- Go to the Advanced Settings tab, then into the URL Mapping section.
- In the Source ID field, specify “DeviceID.“ The notifications will contain alerts from one monitoring device.
- For the Update Alert When condition, specify the SourceStatus parameter as “Down” to receive notifications as they are generated by Dotcom-Monitor.
- For the Open Alert When and Update Alert When parameters, specify the SourceStatus as “Test” to receive a test notification from Dotcom-Monitor.
- Once the integration has been configured, click COPY URL next to the newly created API URL.
By default, AlertOps notifications contain a general description of a problem detected while monitoring. To receive more detailed notifications, you can customize the Long Text field by specifying the necessary static and dynamic text in the field (Advance Settings > URL Mapping).
On the Dotcom-Monitor side:
- Log in to your Dotcom-Monitor Account and go to Manage > Delivery Address Groups.
- Select the notification group assigned to the device you want to post messages from. Alternatively, you can create a new group and assign it to the device, if necessary.
- On the Edit screen, in the Delivery Address section, click Add and select AlertOps as a new address type.
- Paste the AlertOps API URL into the Integration URL field.
- Apply changes.

