To create a Delivery Address Group, on the left sidebar, go to Manage > Delivery Address Groups and click New Group.
First, specify a descriptive name that is recognizable in a list when assigning groups to alerts and reports. You can do this by clicking the default name of the group at the top left of the group editor screen.
Specifying a Delivery Address for Alert Notifications
In the Delivery Addresses section, click New Address to specify a recipient address:
- Select the alert-delivery mechanism. Please see the detailed description of available delivery mechanisms in the Alert-Delivery Mechanisms of our Knowledge Base.
- Provide the address details like an email address for email notifications or phone number for phone and SMS notifications.
Advanced Settings
Depending on the address type, you can additionally configure advanced settings of the delivery address. If not set, the default settings will be applied.
To specify custom settings for your alert notifications delivery, expand the Advanced Settings section.
For Email and Wireless Email mechanisms, you can specify a Reply-To address and a custom email Subject. To set the email format, select a required format in the Email Type field.
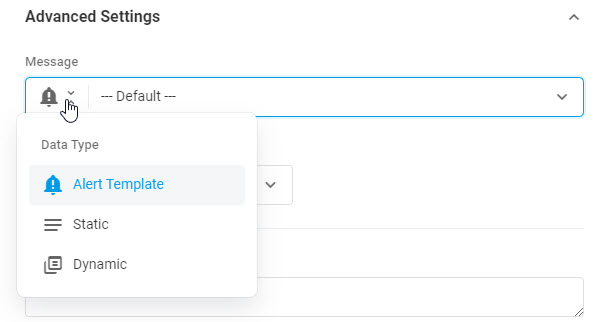
To send a notification message with customized content, select the message type in the Message field:
- Alert Template: You can select from different Custom Alert Templates with specific information for different notification groups. To select a preconfigured template, click the message input field and select the template from the list.
- Static: The static message content can be entered directly in the message input field.
- Dynamic: Alert messages can be personalized by using dynamic variables that will be substituted with the current system values upon sending an alert. Dotcom-Monitor dynamic templates are implemented with Microsoft’s Razor parsing engine and can be created from within the message input field. Please learn how to work with dynamic variables in the Adding Dynamic Variables to Alert Template Knowledge Base article.
If you want to leverage alert templates created before or use our predefined HTML snippets, expand the message input field and use the message editor advanced functionality as described in the Alert Template: Setup and Configuration (Text & HTML & JSON) article of our Knowledge Base.
To select when the notification must be triggered, choose one of the trigger events in the Deliver On list:
- Alerting: An error event, that triggered the alerting system and changed the device state to alerting. Note that alerting state is triggered only if the group alerting is set for a device, read our comprehensive device alerting overview for more details.
- OK: An uptime alert event, when the device left the alerting state. An uptime alert is an automated message that can be configured to be sent to recipients once a device has left an error state and all detected errors have been resolved. Read more in our Uptime Alerts Knowledge Base article.
- Alerting & OK: An alert notification will be generated for both error and error-resolved events.
Scheduling Notifications
A schedule determines when the group will receive alert notifications. To assign a schedule to the group, select a required schedule name from the list in the Schedule section of the group editor screen.
Assigning Devices
There are two ways to assign a device to a notification group:
- You can assign monitoring devices to the group in a bulk in the Assigned Devices section of the group editor screen. To do this, click Assign and select a required device name.
- You can assign the group to a particular device from within the device editor. See the Setting Up Group Alerting for Device article of our Knowledge Base.

